How To Install A New Insole In A Shoe
Quick Answer
To install new insoles in your shoes, first remove the original insoles if they are removable. Compare the old and new insoles, use the old insole as a trimming guide if necessary, trim the new insole gradually, and insert it into the shoe toe-first. Make sure the insole lies flat inside the shoe without curling or bunching.
Many shoes come with basic factory insoles that mainly cover the footbed. Depending on the shoe design and the wearer, these insoles may not always provide the desired level of cushioning, support, or comfort.
If your shoes still fit well but you want to improve the underfoot feel, adding a suitable replacement insole can be a practical option. Before installing a new pair, it is important to choose the right type and make sure it fits correctly inside the shoe.
Before You Start: Should You Remove the Original Insole?
For most full-length replacement insoles, it is usually better to remove the original removable insole first. This helps avoid making the shoe too tight and allows the replacement insole to sit properly inside the shoe.
Some thin insoles, 3/4-length insoles, heel cushions, or other inserts may be designed to sit on top of the existing insole. Always consider the available space inside the shoe and the instructions for the specific insole you are using.
If the factory insole is glued down, do not force it out if doing so may damage the shoe. A paper template can be used to check and trim the replacement insole instead, as explained later in this guide.
What to Consider Before Buying Replacement Insoles
When choosing a good pair of insoles, consider the following factors:
1. Arch Type
Choose an insole that matches the support needs of your foot. Insoles are commonly available with different levels of arch support, including low, medium, and high arch designs.
2. Foot Condition and Comfort Needs
Think about why you are replacing the original insole. Some people mainly want additional cushioning, while others may prefer more stability or arch support.
If you experience persistent foot pain or have a diagnosed foot condition, consider seeking advice from a qualified healthcare professional rather than relying only on an over-the-counter insole.
3. Reasonable Price
If this is your first time buying replacement insoles, compare the materials, construction, durability, and intended use before making a decision. A higher price does not automatically mean that an insole will be more suitable for every shoe or every user.
4. Moisture Management
Feet can generate heat and moisture during daily wear. Breathable, moisture-managing, or odor-control materials can help improve the environment inside the shoe, especially for sports, work, and long periods of wear.
5. Insole Lifespan
The lifespan of an insole depends on its materials, frequency of use, activity level, body weight, shoe type, and care. Check your insoles regularly for visible compression, deformation, worn surfaces, reduced cushioning, or loss of support.
6. Appropriate Size
Choose an insole that matches your shoe size. Many full-length replacement insoles are designed as trim-to-fit products. If trimming is required, it is usually better to start slightly larger and remove material gradually rather than cutting too much at once.
How to Install New Insoles in Shoes: Step-by-Step
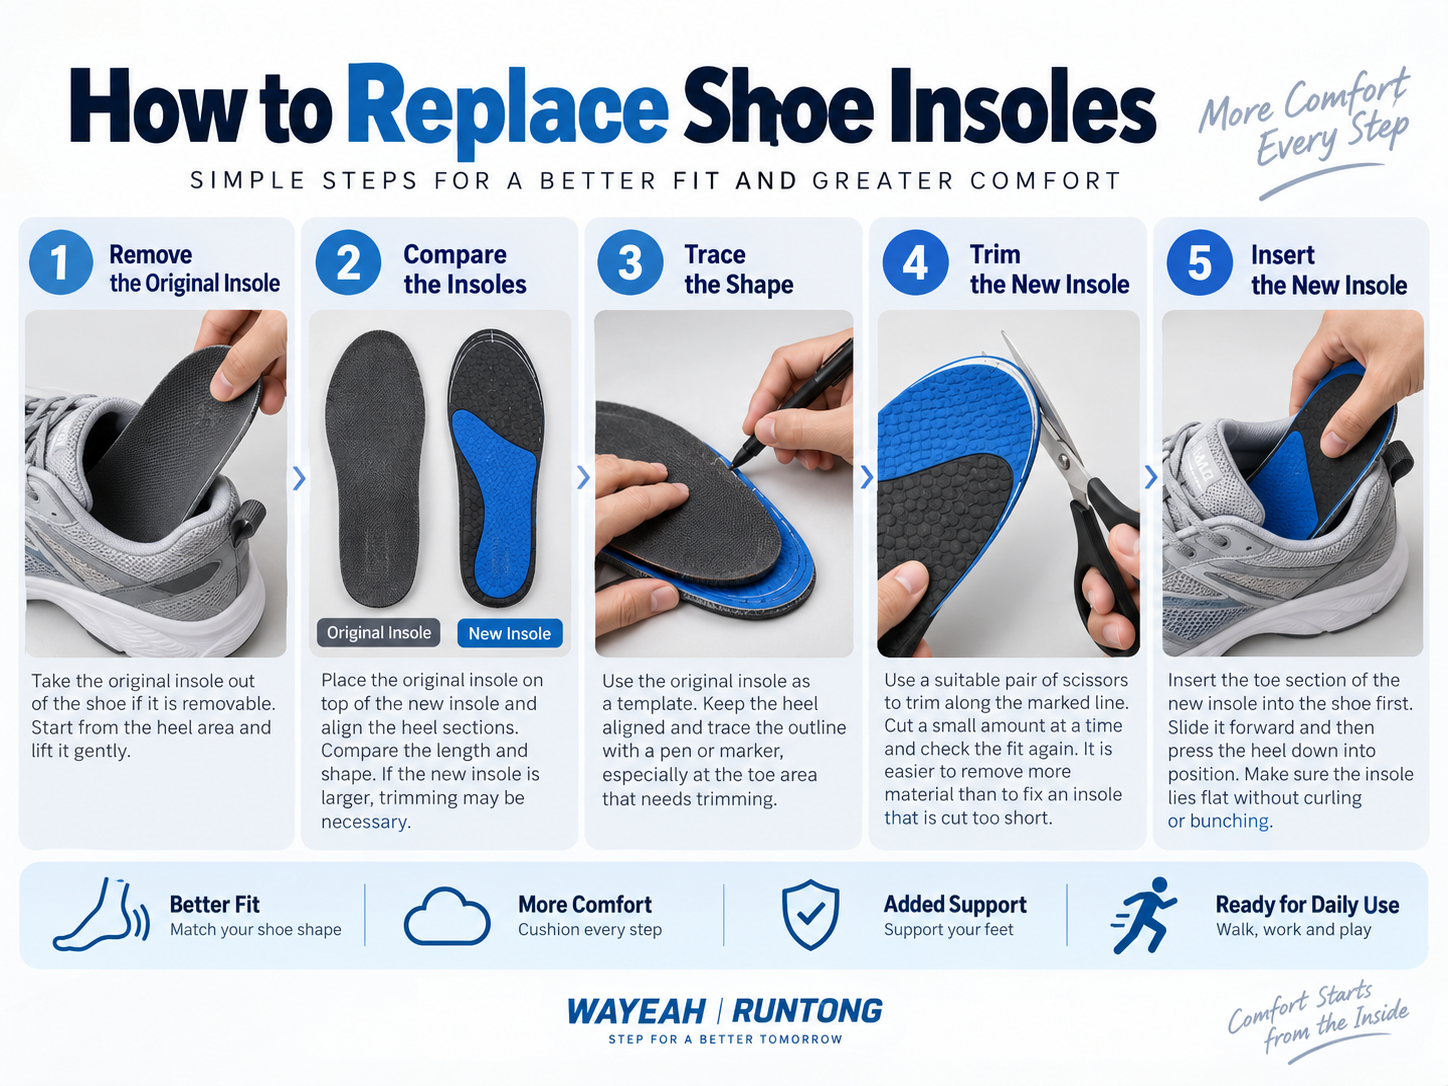
Installing replacement insoles is usually straightforward. The most important points are to compare the size carefully, trim gradually when necessary, and make sure the finished insole lies flat inside the shoe.
Step 1: Remove the Original Insole
Take the original insole out of the shoe if it is removable. Start from the heel area and lift it gently.
Keep the original insole because it can be used as a useful reference for the size and shape of the replacement insole.
Step 2: Compare the Old and New Insoles
Place the original insole on top of the new insole and align the heel sections carefully.
Compare the overall length, heel width, forefoot width, and toe shape. If the new insole is already the correct size, trimming may not be necessary.
Step 3: Trace the Shape
If the replacement insole is larger, keep the original insole aligned on top and use it as a template.
Use a pen or marker to trace around the toe and forefoot areas that need trimming. Try to keep the heel position unchanged unless the product instructions indicate otherwise.
Step 4: Trim the New Insole
Use a suitable pair of scissors to trim along the marked line. Cut a small amount at a time.
After the first trim, compare the two insoles again. It is much easier to remove a little more material than to correct an insole that has been cut too short.
Step 5: Insert the New Insole
Insert the toe section of the new insole into the shoe first. Slide it forward until it reaches the front of the shoe, then press the heel section down into position.
Run your fingers around the edges and make sure the insole sits flat without folds, curling, or raised sections.
What If the Original Insole Is Glued Down?
Some shoes have factory insoles that are glued or permanently attached to the footbed. If the original insole cannot be removed easily, avoid pulling it out forcefully because this may damage the shoe.
Instead, you can make a simple paper template to estimate the shape and available space inside the shoe before trimming the replacement insole.
How to Make a Paper Template
- Use a piece of paper that is larger than the inside of the shoe.
- Place the paper inside the shoe and press it flat against the footbed.
- Mark or crease the approximate outline of the inside of the shoe.
- Remove the paper and cut out the template with scissors.
- Place the paper template on the new insole.
- Trace around the template with a pen or marker.
- Trim the replacement insole gradually along the marked line.
- Test the fit inside the shoe before trimming the second insole.
This method allows you to estimate the available space without removing a permanently attached factory insole.
How to Check If Your New Insoles Fit Correctly
After installing the new insoles, check the fit before wearing the shoes for a long period.
- The insole should lie flat from the heel to the toe.
- The heel of the insole should sit securely at the back of the shoe.
- The toe area should not curl upward.
- The sides should not fold or bunch.
- Your toes should still have enough room inside the shoe.
- Your heel should not be pushed excessively upward.
Put both shoes on and walk for a few minutes. If the shoe feels unusually tight or the insole moves, curls, or creates uncomfortable pressure, remove it and check the size and position again.
Common Mistakes When Installing Insoles
Putting a Thick Insole on Top of the Original Insole
Using two full-length insoles can reduce the space inside the shoe and may make the footwear feel too tight.
Cutting Too Much at Once
Trim gradually. Once an insole has been cut too short, the removed material cannot be replaced.
Not Aligning the Heel Before Trimming
Always align the heel sections first when using the original insole as a template. This helps keep the forefoot and arch area in the intended position.
Leaving the Toe Area Curled
If the front of the insole curls or folds, remove the insole and check whether additional trimming is required.
Choosing an Insole That Is Too Thick for the Shoe
Different shoes have different amounts of internal space. Slim casual shoes may require a thinner insole than work boots or athletic footwear.
Frequently Asked Questions About Installing Insoles
Do I Need to Remove the Original Insoles Before Adding New Ones?
For most full-length replacement insoles, remove the original removable insole first. This usually provides enough space for the replacement insole and allows it to sit properly on the footbed.
Can I Put New Insoles on Top of Old Insoles?
It depends on the type and thickness of the insert. Thin inserts or partial-length products may sometimes be used with the original insole, but stacking two thick full-length insoles can make the shoe too tight.
How Do I Trim Insoles to Fit My Shoes?
Remove the original insole and place it on top of the replacement insole with the heels aligned. Trace the original shape and trim the replacement gradually, checking the fit after each cut.
Which Part of the Insole Should Go Into the Shoe First?
Insert the toe section first and slide it toward the front of the shoe. Then lower the heel section into place and make sure the entire insole lies flat.
What If the Original Insole Is Glued Into the Shoe?
Do not forcefully remove a glued insole if this may damage the shoe. You can use a paper template to estimate the internal shape and trim the new insole accordingly.
How Do I Know If My New Insoles Fit Correctly?
A correctly fitted insole should lie flat, remain stable inside the shoe, and should not curl at the toes or bunch along the sides. The shoe should also retain enough room for your feet.
Choosing Replacement Insoles for Different Types of Shoes
The best insole design depends partly on the footwear in which it will be used. Athletic footwear may benefit from lightweight cushioning and stability, while work shoes may require greater durability and long-lasting cushioning. Everyday footwear often requires a balance between comfort and thickness.
You can explore our shoe insole range, including sport insoles, gel insoles, and orthotic insole designs.